
How to Start a Travel Blog: A Step-by-Step Guide
Have you ever returned from a trip and thought: “I wish someone had told me this before I left”? That one thought is the birthplace of many of the world’s best travel blogs including this one.
Starting a travel blog is not only possible, it is one of the most rewarding things you can do if you love travel. You get to document your adventures, help other travellers, build a global community, and yes, earn real money doing it.
But let’s be honest: the internet is full of travel blogs. To stand out, you need more than great photos and a catchy name. You need a strategy.
This article will walk you through everything, step by step, from picking your niche and setting up your website, to writing content that ranks on Google and turning your blog into a real income stream. Whether you’re a complete beginner or someone who started a blog and got stuck, this is the article for you.
Step 1: Get Clear on Your “Why” And Your Niche
Before you buy a domain name or sign up for hosting, the most important question to answer is this: Why do you want to start a travel blog?
The answer matters because it will shape everything, your content, your audience, and how you make money. Are you looking to:
- Document your travels for friends and family?
- Build a side income while working a regular job?
- Eventually travel full-time and fund it through your blog?
- Build a personal brand and become a travel influencer?
There is no wrong answer. But knowing your goal helps you make better decisions from day one.
Choose a Niche, Don’t Try to Cover Everything
One of the biggest mistakes new travel bloggers make is trying to write about all things travel. The internet already has thousands of general travel blogs. You need to be specific.
Think of your niche as the answer to: “Who exactly is my blog for, and what specific type of travel do I cover?”
Here are some niche ideas to consider:
- Solo female travel in Africa
- Budget backpacking through Southeast Asia
- Family travel with young children
- Luxury travel on points and miles
- Adventure travel and extreme sports
- Food and culinary tourism
- Van life and road trips
- Travel for people with disabilities
- Travel Photographer
Pro Tip: The more specific your niche, the less competition you face and the more loyal your audience will be. You can always expand later once you’ve built authority.
Step 2: Choose a Blog Name and Buy Your Domain
Ok, now that you have chosen a niche, next you will need a name for your blog. Your blog name is your brand. It is the first thing that visitors see once they arrive at your website, therefore It needs to be easy to remember, easy to spell, and reflect what your blog is about. Below are some guidelines you should keep in mind when choosing a blog name:
- Keep it short, ideally two to three words
- Make it easy to pronounce and spell
- Avoid numbers and hyphens in the name
- Check that it’s available on social media platforms too
Once you’ve chosen a name, you need to register your domain. A domain name is the address of your blog, in most cases it is exactly the same with your blog name. And they both reflect what your blog is about. Take for instance you are writing about Holiday Travel Memories, Your blog name be any of these: My Holiday Chronicles, Wander Memory, Holiday Trails & Tales.
if your blog name is My Holiday Chronicles; then your domain name should be myholidaychronicles.com. if you chose Wander Memory, then your domain name will be wandermemory.com etc.
Bonus Tip: If you are confused on which blog name to use simply go to chatgpt.com, google.gemini.com or any Ai tool you are familiar with and describe what you have in mind, you will get a list of name suggestions to choose from.
A domain name typically costs around $10 to $15 per year. Popular registrars include Spaceship (the one I use), Namecheap, GoDaddy, and Squarespace. Many hosting providers also offer a free domain when you sign up paying for 2years hosting or more.
Important: Always go for a .com domain if it’s available. It’s the most trusted and universally recognised extension.
Step 3: Set Up Your Blog, Hosting and WordPress
Getting your travel blog ready begins with the technical setup of the website beginning with the server and CMS (Content Management System) software. Here’s my step-by-step guide to help you set up your travel blog.
Stage 1: Choose your Hosting Provider
Web hosting is similar to renting a space online where your blog will be domicile. There are numerous hosting providers, but I will be focusing on the three most popular options that are beginner-friendly.
- Go to a Hosting Provider’s Website like:
- NameCheap
- Bluehost
- SiteGround
Or any other hosting provider you prefer; ensure the host with a cpanel.
- Choose a Hosting Plan
Most hosting providers offer multiple plans. For a new blog, the basic planis usually good enough. You can always switch to a higher plan as your blog grows. - Register Your Domain Name
Some hosting services (like Namecheap) include a free domainfor the first year depending on the package your select. During registration, you’ll be asked to enter your domain name. - Complete the Purchase
Once you’ve picked your plan and registered the domain, complete the purchase by entering your payment details. Basic hosting plans usually range from $30 to $120 per annum, depending on the platform you choose
Stage 2: Install WordPress
WordPress is the most popular platform for blogging. Most hosting providers offer a one-click WordPress installation process.
- Log into Your Hosting Dashboard
After purchasing your hosting plan, sign in to your account dashboard on your hosting provider’s website. - Find the WordPress Installer
Most dashboards include a button for WordPress installation. Look for something labeled “Install WordPress” or “One-Click Install.” - Run the Installation
Follow the prompts to install WordPress. You will be asked to set up a WordPress admin username and password. Write these down, as you’ll need them to log into your blog. - Access Your WordPress Dashboard
After installation, you can access your WordPress dashboard by going to yourdomain.com/wp-admin and entering your admin login details.
Stage 3: Choose and Install a Theme
A theme determines the visual design and layout of your blog. WordPress provides thousands of free and premium themes that you can select from.
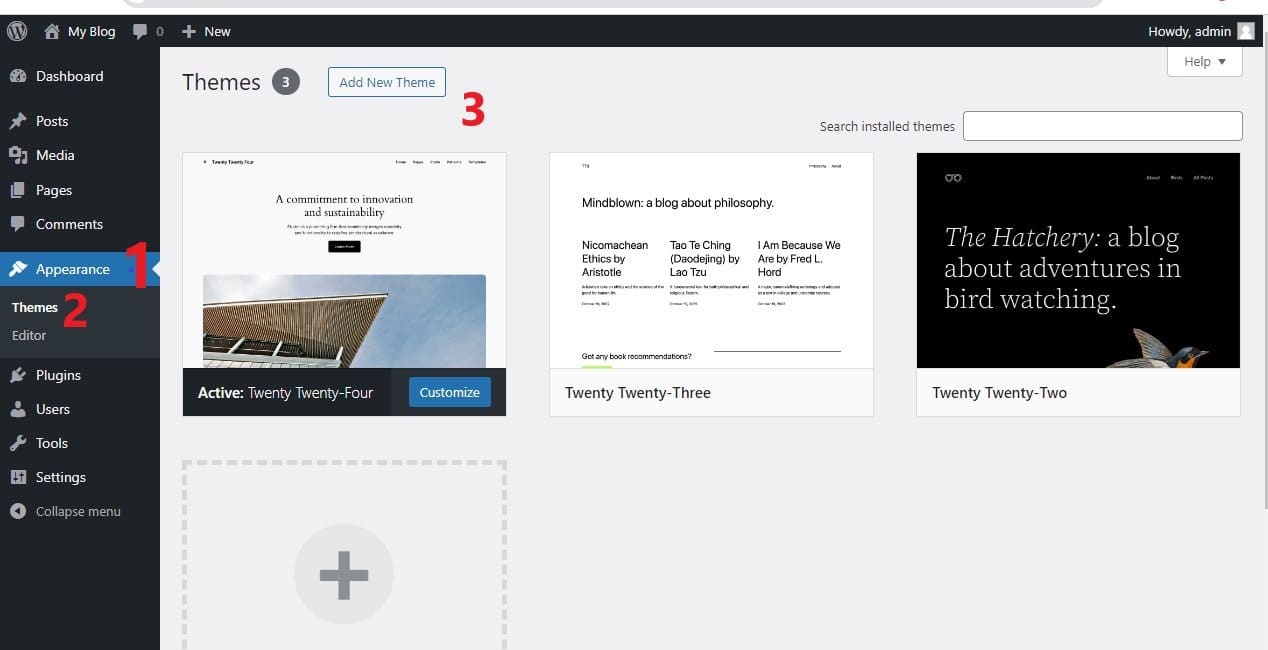
- Go to Appearance > Themes
In your WordPress dashboard, navigate to the Appearance section and choose Themes. - Click on “Add New”
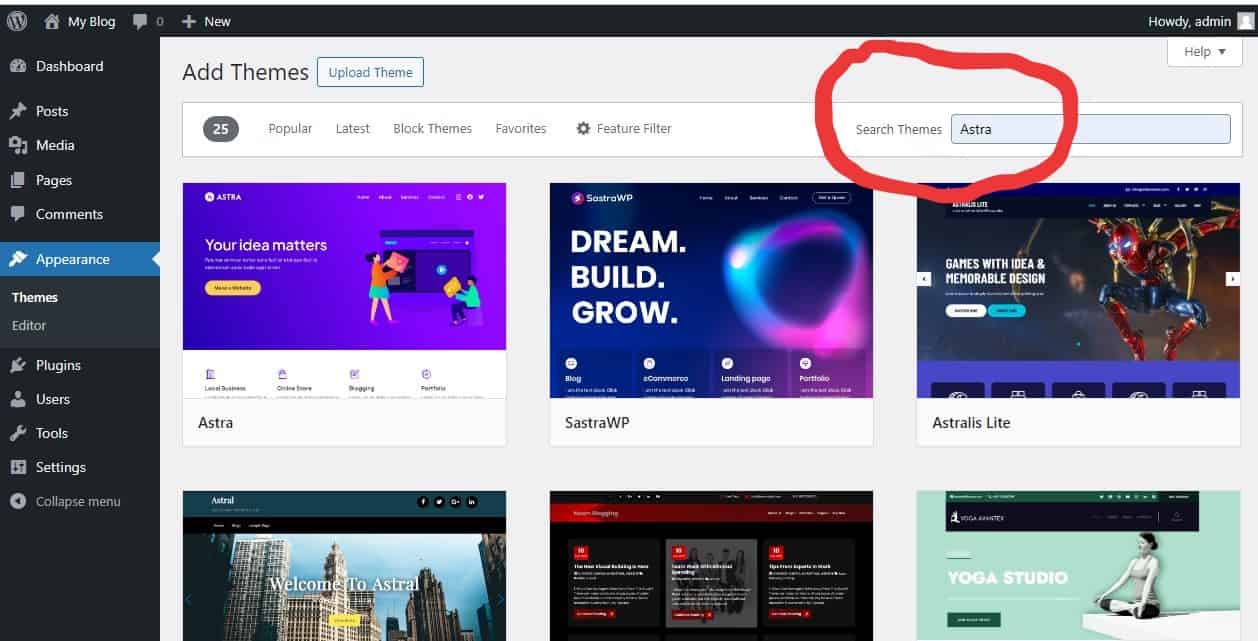
You’ll be taken to the WordPress theme directory, where you can browse or search for different themes. - Search for a Theme
Some well-known free themes for travel blogs include:
• Astra
• OceanWP
• GeneratePress
- If you prefer a premium theme, you can buy one from marketplaces such as ThemeForest.
- Preview and Install
Once you’ve found a theme you like, click Preview to see how it appears. If you’re satisfied, click Install and then Activate to apply it to your blog.
Stage 4: Customize Your Theme
Once your theme is activated, you’ll want to personalise it to match your blog’s brand.
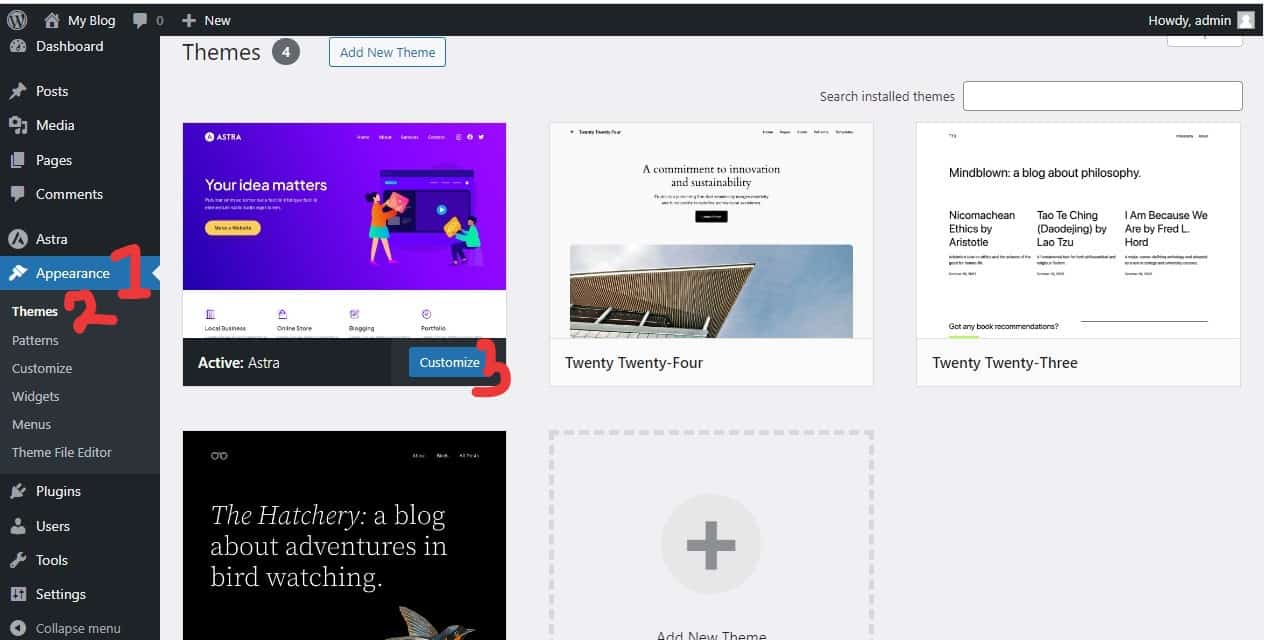
- Go to Appearance > Customize
This will open the WordPress customizer, where you can adjust various settings. - Change the Site Title and Tagline
Your site title should represent your blog name, and your tagline should be a brief description of what your blog is about. You’ll find this option under the Site Identity section. - Customize Fonts and Colors
Depending on your theme, you’ll have options to adjust fonts, colors, and layouts. Choose styles that match your brand. For example, if your niche is adventure travel, you may prefer bold, vibrant colors. - Set Up Menus and Widgets
Menus help visitors navigate your blog. Go to Appearance > Menus to create and organise your navigation bar. Widgets let you add extra content to your sidebar or footer, such as search bars or social media icons.
Stage 5: Install Essential Plugins
Plugins enhance the functionality of your WordPress site. Below are essential plugins for travel bloggers:
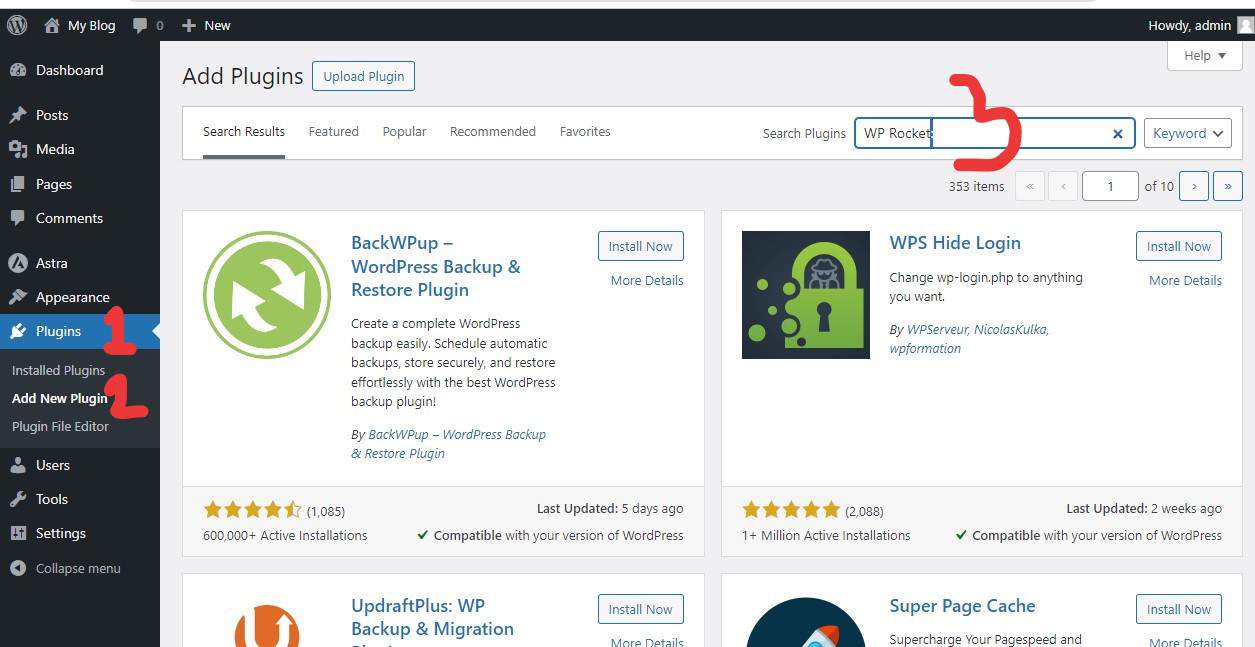
- Go to Plugins > Add New
In your WordPress dashboard, go to the Plugins section and click on Add New. - Install the Following Plugins:
• Yoast SEO: Helps optimise your content for search engines. You can download it for free from the WordPress plugin directory.
• WP Rocket: Boosts your blog’s loading speed by caching your pages. You can purchase it from WP Rocket.
• Akismet: Protects your blog from spam comments. You can install it directly through WordPress.
• Smush: Compresses and optimises your images for faster loading times. Install Smush here. - Activate the Plugins
After installing each plugin, click Activate to begin using it on your blog.
Stage 6: Configure Your Blog’s Settings
Before you start publishing content, you’ll need to configure some basic settings for your blog.
- Set Up Permalinks
Go to Settings > Permalinks and choose the Post Name option. This will make your blog’s URLs SEO-friendly (e.g., www.yourdomain.com/how-to-start-a-travel-blog). - Create Essential Pages
Every blog should include a few basic pages, such as:
• About Page: Introduce yourself and explain what your blog is about.
• Contact Page: Provide a form or email where readers and brands can contact you.
• Privacy Policy Page: Inform visitors how you handle their data (important for GDPR compliance). - Set Up Social Media Links
If you use social media (Instagram, Pinterest, etc.), be sure to add links to your profiles. Most themes allow you to display social media icons in your header or footer.
Setting up your travel blog is a simple process when broken down step by step. From choosing a hosting provider and installing WordPress to selecting a theme and configuring essential plugins, this stage-by-stage guide covers everything you need to get started. Now that your blog is set up, you’re ready to move on to creating engaging content and growing your audience!
Step 4: Plan Your Content Strategy
A travel blog without a content strategy is like a trip without a plan, you might get somewhere interesting, but you’ll waste a lot of time getting there.
Your content strategy answers three key questions: What will you write about? Who are you writing for? And how often will you publish?
Types of Content That Perform Well
Not all blog posts go viral. These content types tend to attract the most traffic:
- Destination Guides, “Complete Guide to Visiting New York in 2026”
- Itineraries, “7 Days in Morocco: The Perfect First-Timer’s Itinerary”
- How-To Posts, “How to Get a Canadian Passport in 2026 (Step-by-Step)”
- Listicles, “15 Cheapest Countries to Visit From Japan”
- Reviews, “Honest Review: Flying Fly540 from Lagos to Nairobi”
- Comparison Posts, “Airbnb vs Hotel: Which is Better for Solo Travellers?”
How Often Should You Post?
Consistency matters more than frequency. It is better to publish two high-quality posts per month than eight rushed, low-quality ones. As a beginner, aim for one to two posts per week and focus on quality, depth, and genuine helpfulness.
Key Insight: Google rewards content that demonstrates real experience and expertise (known as E-E-A-T: Experience, Expertise, Authoritativeness, and Trustworthiness). Write from your own genuine experiences, not just facts you found online.
Step 5: Write Content That Ranks on Google (SEO Basics)
You could write the most beautiful, detailed travel guides in the world, but if no one can find them, they won’t help anyone. Search Engine Optimisation (SEO) is how you make sure your posts show up on Google when people search for topics related to your blog.
Keyword Research
A keyword is the phrase someone types into Google. Your goal is to write posts that target keywords your ideal reader is searching for, where competition is manageable.
For example, targeting “travel” is too broad and competitive. But “budget travel tips for Nigeria to Ghana” is more specific and much easier to rank for.
Free and affordable tools to help with keyword research:
- Google Search (type your topic and check the “People also ask” section)
- Ubersuggest, free tier available
- Keysearch, affordable and beginner-friendly
- Google Keyword Planner, free with a Google account
On-Page SEO Basics
Once you have your keyword, use it strategically in your post:
- Include it in your post title (H1)
- Use it naturally in the first 100 words of your post
- Include it in at least one subheading (H2 or H3)
- Add it to your meta description (the short summary shown in Google results)
- Use it in your URL slug (e.g., sunnyonlinetravel.com/budget-travel-nigeria)
Write Long, Detailed Content
Longer, more comprehensive posts tend to rank better. Aim for at least 1,500 words per post and cover the topic as thoroughly as possible. Think: “What does someone need to know to feel confident about this destination or topic?”
2026 Update: With AI tools now answering basic questions directly, generic content no longer ranks well. Focus on first-hand experiences, personal stories, and unique insights that AI cannot replicate. That is your competitive advantage.
Step 6: Build Your Audience
Writing great content is step one. Getting people to read it is the next challenge. Here are the most effective ways to grow your audience as a travel blogger in 2026:
1. Social Media
You don’t need to be on every platform. Choose one or two and do them well. The most effective platforms for travel bloggers currently are:
- Instagram, great for destination photography and Reels
- Pinterest, highly underrated for driving blog traffic; excellent for travel content
- TikTok, short video content that can go viral and drive blog visits
- YouTube, for those comfortable on camera; longer form and very lucrative
The goal of social media is to drive people back to your blog, grow your email list, and build brand awareness.
2. Build an Email List from Day One
Your email list is the most valuable asset you will build as a blogger. Unlike social media followers (which platforms can take away), your email list belongs to you.
Offer a free resource in exchange for email sign-ups, for example, a free packing list, a travel budget spreadsheet, or a beginner’s guide to a specific destination. Tools like Brevo, MailerLite, or ConvertKit make this easy to set up.
3. Collaborate with Other Bloggers
Guest posting, link exchanges, and community participation are powerful ways to grow. Leave thoughtful comments on other travel blogs, participate in Facebook groups for travel bloggers, and reach out for guest post opportunities.
Remember: Blogs with email lists reach 35 to 55% of subscribers with every newsletter. Compare that to 1 to 2% organic reach on social media, email always wins.
Step 7: How to Make Money From Your Travel Blog
This is the question everyone asks. The honest answer is: it takes time. Most successful travel bloggers start seeing meaningful income after 12 to 18 months of consistent work. But when it comes, it can be substantial.
1. Affiliate Marketing
Affiliate marketing means recommending products and services and earning a commission when someone purchases through your link. It’s one of the most popular and scalable income streams for travel bloggers.
Top affiliate programmes for travel bloggers:
- Booking.com and Hotels.com, commissions on hotel bookings
- GetYourGuide and Viator, commissions on tours and experiences
- TravelPayouts, an affiliate network aggregating many travel programmes
- Amazon Associates, for travel gear and accessories
- Airbnb, SafetyWing (travel insurance), and various airline programmes
Honest Reality: Affiliate marketing takes time to build. Expect at least 6 to 12 months before meaningful commissions come in. But it compounds, the same posts can earn commissions for years.
2. Display Advertising
Once your blog grows, you can earn passive income by displaying ads. Popular ad networks for bloggers:
- Google AdSense, available from day one, but low earnings
- Mediavine Journey, requires 1,000 monthly sessions; much higher earnings than AdSense
- Mediavine or Raptive, for established blogs with higher traffic
3. Sponsored Content and Brand Partnerships
As your blog grows, travel brands, tourism boards, and hotels may pay you to write about them or feature their products. This can be very lucrative, but requires an established audience and a professional media kit.
4. Digital Products
Creating your own digital products is one of the most sustainable income streams available. Examples include:
- Travel itinerary guides (PDF downloads)
- Destination-specific eBooks
- Online courses (“How to Plan a Solo Trip to West Africa”)
- Printable packing lists or budget planners
The beauty of digital products is that you create them once and sell them repeatedly, while you’re sleeping, sightseeing, or travelling.
5. Travel Consulting and Services
If you develop genuine expertise, you can offer personalised trip planning, travel coaching, or consulting services. This can command premium rates because it’s tailored and high-value.
Key Advice: Never rely on just one income stream. The most resilient travel bloggers in 2026 have multiple streams: some passive (ads, affiliate), some active (consulting, sponsored posts), and some scalable (digital products).
Step 8: What to Expect, A Realistic Timeline
One of the most important things to understand about travel blogging is that it is a long game. Here is a realistic breakdown of what to expect:
Months 1–3: Set up your blog, establish your niche, and publish your first 10 to 15 posts. Focus entirely on writing quality content and learning SEO basics.
Months 4–6: Start seeing early Google rankings, grow your social media presence, and set up your email list. Apply for your first affiliate programmes.
Months 7–12: Traffic starts building more consistently. First affiliate commissions begin to arrive. Focus on growing your email list and creating a digital product.
Year 2 and beyond: Income starts to snowball. Brands begin reaching out for partnerships. Your audience grows through word of mouth. This is where things get exciting.
Mindset Reminder: Every successful travel blogger you admire went through a slow start. The ones who made it simply didn’t quit. Consistency over time is the single biggest predictor of success.
Final Thoughts: Is Starting a Travel Blog Worth It in 2026?
Absolutely, but only if you approach it with the right mindset. Travel blogging is not a get-rich-quick scheme. It is a real business that rewards patience, consistency, genuine expertise, and a willingness to help others.
The bloggers thriving in 2026 are the ones who write from personal experience, serve a clearly defined audience, diversify their income, and keep going when growth feels slow.
You have a unique story to tell. Your perspective on travel, shaped by where you’re from, the places you’ve been, and the lessons you’ve learned, is something no one else can replicate. That is your greatest competitive advantage.
So take the first step today. Choose your niche, register your domain, and publish your first post. The journey of a thousand blog posts begins with one.
Happy travels, and happy blogging!
— Sunny Dave | SunnyOnlineTravel.com


